Showing posts with label blogger. Show all posts
Replace Threaded Comments With Google + Comments in Blogger
.jpg) I hope that you might be familiar with the latest commenting system Google has introduced that integrates Google+ comments with Blogger blogs. This new commenting system is a major improvement over the default Blogger system, and it supports threaded comments. It also looks a lot better. We earlier shared a tutorial on how to enable this new Google Plus commenting system for Blogger blogs. But some people still have problems implementing it on custom templates. For them, we have compiled this short tutorial on how to effectively implement and use this new improved commenting system.
I hope that you might be familiar with the latest commenting system Google has introduced that integrates Google+ comments with Blogger blogs. This new commenting system is a major improvement over the default Blogger system, and it supports threaded comments. It also looks a lot better. We earlier shared a tutorial on how to enable this new Google Plus commenting system for Blogger blogs. But some people still have problems implementing it on custom templates. For them, we have compiled this short tutorial on how to effectively implement and use this new improved commenting system.Switching To Google + Comments
To enable Google Plus comments for your Blogger blog, you will first have to connect your account to your Google+ account. To do this, just follow these steps.
- Log into your Blogger dashboard, and choose a blog you want to connect
- Click on the Google+ button from the left sidebar
- Click on the Get Started button on the top-left side to connect your account. This will not appear if your account is already linked.
- Follow the simple instructions to connect your blog.
- Once connected, you will see an option Use Google+ comments on this blog. Checking this will enable the new Google Plus commenting system.
Displaying Google comments on custom templates
To do that, you can revert your Blog Widget to defaults in your template HTML editor via the following steps.
- From inside your blog's dashboard, click on Template from the left sidebar.
- Click on Edit HTML
(Before moving on, we'd suggest you backup your template, just in case anything goes wrong)
- Click on the Revert Widget templates to defaults button
- Now, Be careful to select Blog1 Widget from the list. Do not select any other, as it will reset other widgets to default as well.
<b:if cond='data:blog.pageType == & quot;static_page"'><b:if cond='data:post.showThreadedComments'><b:include data='post' name='threaded_comments'/><b:else/><b:include data='post' name='comments'/></b:if></b:if><b:if cond='data:blog.pageType == & quot;item"'><b:if cond='data:post.showThreadedComments'><b:include data='post' name='threaded_comments'/><b:else/><b:include data='post' name='comments'/></b:if></b:if>
Carefully look at the bolded code, and then replace them with the following line of code.
<b:include data='post' name='comment_picker'/>
If you want to display comment count, you can simply modify the above line of code
<b:include data='post' name='comment_picker'/>
Still not working? Please feel free to mention your queries in the comments below. And please try to be as relevant as possible. Thank you :)
How to Enable Google + Comments on Custom Blogger Templates

Enabling Google Plus comments
To Enable Google + Comments on blogger,first log into your Blogger account, and click on the blog you want to add Google Plus comments to. Now, click on the Google+ option on the left sidebar. You must be the admin of a blog to be able to view this option.
Now, you need to upgrade our account, and integrate it with Google Plus if you haven't already done so. You will get a "Get Started" button if you haven't. Follow the simple instructions, and then move on to the next step.
Check the option that says Use Google+ Comments on this Blog - For default templates, this is pretty much all you need to do.
 For custom templates, here's what you need to do;
- Click on the Template tab from the left sidebar, and then click on Edit HTML.
- From the code editor, press Ctrl + F, and search for the following line of code
<div class='comments' id='comments'>
- After the above code Just paste the Below Code.
<div class='cmt_iframe_holder' expr:data-href='data:post.canonicalUrl'expr:data-viewtype=' data:post.viewType'/>

Take care not to make a mistake while editing. And it would be a good idea to backup your template (Backup/Restore option at the top-right), just in case.
For comments to work on custom templates, you need to add the code as well as to enable it.

Six ways to improve your blog with Google+
.jpg)
Here are the Six things that a Blogger should know to improve his Blog

Add Google+ buttons and gadgets
Help readers to follow and share your posts on Google+ with the +1 button, Google+ badge and Google+ Followers gadget. Visit the Layout tab, click "Add a gadget" and select the Google+ gadgets that you'd like to add.
 Manage comments in one place
Turn on Google+ Comments to bring comments on your posts together in one place, including posts about your content in Google+.

Share your posts with a new audience
Share your blog posts publicly on Google+ and encourage your readers to re-share. Add hashtags when you share to tie your posts to relevant themes and trending topics, increasing their visibility.
 Connect with readers face to face
Host a group video chat conversation with your readers in a Google+ Hangout. You can live-stream it and post the final video on your blog.


Spark up conversations with Google+ mentions
Add Google+ mentions to your posts to get someone's attention. Your mention will link to their Google+ page or profile, and you can notify them when you share.
Bringing Google+ Comments to Blogger
.jpg)
Starting today, you can bring Google+ Comments to your Blogger blog. Once you've enabled the feature through your Blogger Dashboard, you'll enjoy a number of important benefits:
View your blog and Google+ comments, all in one place
Now when you're browsing your blog's comment threads, you'll see activity from direct visitors, and from people talking about your content on Google+. For example, if there's a public Google+ discussion about one of your blog entries, those comments and replies will also appear on your Blogger blog. This way you can engage with more of your readers, all in one place.
Help readers comment and connect with their circles
Your blog readers will now have the option to comment publicly, or privately to their circles on Google+. And when they're browsing blog comments, they can view all of them, just the top ones, or only those from the people in their circles.
In all cases, you and your readers will only see the comments you have permission to see. Giving people these kinds of controls not only encourages more meaningful sharing—it can lead to more blog traffic.
To get started with Google+ Comments, just visit the Google+ tab of your Blogger Dashboard, and check “Use Google+ Comments.” (Older comments will continue to appear in the new widget.)
Google's Latest SEO Book To Optimize your Blogs
Now a Days Google's latest cheat sheet ebook has become very popular among bloggers.Whether you are a new comer or you already have a blog, Google always helps you . At the Google Webmaster Central blog, you will find any number of news, tutorials, tips, and best practices involved with webmastering. Google has released many items related to Search Engine Optimization. Google has released an ebook some time ago which contains all the basic SEO tips you want.
Now, for starters, Google has released a new one-page quick-start eBook which captures the essence of SEO as it is used today.
Dubbed as a 'first steps cheat sheet' by Google, this eBook is specifically designed for people who have set up a blog or an online presence, but haven't given much thought to search. They might have made some content, but don't know the ABC of getting their website into Google Search.
This book is a very short and concise guide on search engine optimization, with tips on how to create SEO friendly design, This will help search engines like Google itself to better understand the content on your site, and hence will increase its visibility.
Take a look at this amazing one-page SEO eBook here.
.png)
How to download this eBook?
Here's the direct download link to this eBook;
Download: Google One Page SEO Guide
If you're more of an advanced user, we something for you too! You can check out the more extensive Google SEO Starter Guide that will detail you through most of the basic SEO aspects.
This eBook is free to use, and you can distribute or print it as you like! Give it a read, and share the knowledge with others too and increase awareness! All the best :)
How to add "Reply Button or Link" to Blogger Blog.
As you see on websites ,whether like youtube or forums,all these great websites have reply link attached to every comment published .Fortunately we can also ad reply link to our blogger blogs.
How to add "Reply Button or Link" to Blogger Blog.
- Go to Blogger > Select your Blog >Template > Edit Html.
- Back up your template first.
- Tick the " Expand Widgets" Box on the left top of html editor.
- Search For ]]></b:skin>
- And Paste the Below Code Just above it.
/*--------------CBT Reply Link --------------*/.MBT-replycomments{background:#ECEAEA;cursor:pointer;color:#fff;margin:5px 0;float:right;border:none;padding:4px;-moz-border-radius:6px;-webkit-border-radius:6px;border-radius:6px;font:10px sans-serif;}.MBT-replycomments:hover{background:#E7E7E7;}
Make these Changes
- To Change the Link background on active mode edit #ECEAEA
- To Change the Link Background color on mouse hover edit #E7E7E7
- MBT Color Generator tool will be helpful
7. And just above it paste the below code
<dd class='comment-footer'>
<div class='CBT-replycomments'><a expr:href='"https://www.blogger.com/comment.g?blogID=*******************&postID=" + data:post.id + "&isPopup=true&postBody=%40%3C%61%20%68%72%65%66%3D%22%23" + data:comment.anchorName + "%22%3E" + data:comment.author + "%3C%2F%61%3E#form"' onclick='javascript:window.open(this.href, "bloggerPopup", "toolbar=0,location=0,statusbar=1,menubar=0,scrollbars=yes,width=650,height=650"); return false;'>Reply</a></div>
- You can change "Reply" text with your desired one.
- Replace with your BLOG ID. If your are logged into your blogger account then look at your browser address bar. You can clearly see a 18-19 digit code. Just copy it and paste it in place of *******************
- You can find "Blog ID" as shown below in the image
8. Save your template and you are done
Note:
I did not create the code.This code is create BY Mohammad Mustafa Ahmed Zai .
Who is the Admin of Mybloggertricks
How To Add the Twitter Flying Bird To Blogger?
1.Go To Blogger > Design > Edit HTML
2.Backup your template first (Important)
3.Search for </body> Tag
4.And paste the following Code Above this tag
<script src='http://bloggerblogwidgets.googlecode.com/files/way2blogging.org-tripleflap.js' type='text/javascript'></script><script type='text/javascript'>var twitterAccount = "C_A_786";var tweetThisText = " <data:blog.pageTitle/> : <data:blog.url/> ";tripleflapInit();</script>
5.Replace C_A_786 with your twitter username.
6. Save your template and Bingo ! you are Done....
7.Hit View Blog button to see this widget........
Floating Sharing Widget for Blogger/Blogspot

To Add this Beautiful Sharing Widget Follow Bellow Steps:
1.Go To Blogger > Design
2.Choose a HTML/JavaScript widget
3.Paste the following code into it
<style>
/*-------CBT Floating Counters------------*/
#floatdiv {
position:absolute;
width:94px;
height:229px;
top:0;
left:0;
z-index:100
}
#mbtsidebar {
border:1px solid #ddd;
padding-left:5px;
position:relative;
height:220px;
width:55px;
margin:0 0 0 5px;
}
</style>
<div id="floatdiv">
<div id="mbtsidebar">
<table cellpadding="1px" cellspacing="0">
<tr>
<td style="border-bottom: 1px solid #E8E8E8; padding:5px 0 2px 0;">
<div id="fb-root"></div><script src="http://connect.facebook.net/en_US/all.js#xfbml=1"></script><fb:like href="" send="false" layout="box_count" show_faces="false" font=""></fb:like>
</td>
</tr>
<tr>
<td style="border-bottom: 1px solid #E8E8E8; padding:5px 0px;">
<g:plusone size="Tall" expr:href="data:post.url">
</g:plusone></td>
</tr>
<tr>
<td style="border-bottom: 0px solid #E8E8E8; padding:5px 0 0px 0;">
<a href="http://twitter.com/share" class="twitter-share-button" data-count="vertical" data-via="C_A_786">Tweet</a><script type="text/javascript" src="http://platform.twitter.com/widgets.js"></script>
</td>
</tr>
<tr>
<td style="border-bottom: 0px solid #E8E8E8; padding:0px 0 0px 0;">
<p style=" font-size:10px; text-align:center; color:#ddd;"><a style="color:#ddd;" href="http://www.custombloggertutorials.blogspot.com" target="_blank">Widgets</a></p>
</td>
</tr>
</table>
</div>
</div>
<script type="text/javascript">
// JavaScript Document
<!--
/* Script by: www.jtricks.com
* Version: 20071017
* Latest version:
* www.jtricks.com/javascript/navigation/floating.html
*/
var floatingMenuId = 'floatdiv';
var floatingMenu =
{
targetX: 0,
targetY: 300,
hasInner: typeof(window.innerWidth) == 'number',
hasElement: typeof(document.documentElement) == 'object'
&& typeof(document.documentElement.clientWidth) == 'number',
menu:
document.getElementById
? document.getElementById(floatingMenuId)
: document.all
? document.all[floatingMenuId]
: document.layers[floatingMenuId]
};
floatingMenu.move = function ()
{
floatingMenu.menu.style.left = floatingMenu.nextX + 'px';
floatingMenu.menu.style.top = floatingMenu.nextY + 'px';
}
floatingMenu.computeShifts = function ()
{
var de = document.documentElement;
floatingMenu.shiftX =
floatingMenu.hasInner
? pageXOffset
: floatingMenu.hasElement
? de.scrollLeft
: document.body.scrollLeft;
if (floatingMenu.targetX < 0)
{
floatingMenu.shiftX +=
floatingMenu.hasElement
? de.clientWidth
: document.body.clientWidth;
}
floatingMenu.shiftY =
floatingMenu.hasInner
? pageYOffset
: floatingMenu.hasElement
? de.scrollTop
: document.body.scrollTop;
if (floatingMenu.targetY < 0)
{
if (floatingMenu.hasElement && floatingMenu.hasInner)
{
// Handle Opera 8 problems
floatingMenu.shiftY +=
de.clientHeight > window.innerHeight
? window.innerHeight
: de.clientHeight
}
else
{
floatingMenu.shiftY +=
floatingMenu.hasElement
? de.clientHeight
: document.body.clientHeight;
}
}
}
floatingMenu.calculateCornerX = function()
{
if (floatingMenu.targetX != 'center')
return floatingMenu.shiftX + floatingMenu.targetX;
var width = parseInt(floatingMenu.menu.offsetWidth);
var cornerX =
floatingMenu.hasElement
? (floatingMenu.hasInner
? pageXOffset
: document.documentElement.scrollLeft) +
(document.documentElement.clientWidth - width)/2
: document.body.scrollLeft +
(document.body.clientWidth - width)/2;
return cornerX;
};
floatingMenu.calculateCornerY = function()
{
if (floatingMenu.targetY != 'center')
return floatingMenu.shiftY + floatingMenu.targetY;
var height = parseInt(floatingMenu.menu.offsetHeight);
// Handle Opera 8 problems
var clientHeight =
floatingMenu.hasElement && floatingMenu.hasInner
&& document.documentElement.clientHeight
> window.innerHeight
? window.innerHeight
: document.documentElement.clientHeight
var cornerY =
floatingMenu.hasElement
? (floatingMenu.hasInner
? pageYOffset
: document.documentElement.scrollTop) +
(clientHeight - height)/2
: document.body.scrollTop +
(document.body.clientHeight - height)/2;
return cornerY;
};
floatingMenu.doFloat = function()
{
// Check if reference to menu was lost due
// to ajax manipuations
if (!floatingMenu.menu)
{
menu = document.getElementById
? document.getElementById(floatingMenuId)
: document.all
? document.all[floatingMenuId]
: document.layers[floatingMenuId];
initSecondary();
}
var stepX, stepY;
floatingMenu.computeShifts();
var cornerX = floatingMenu.calculateCornerX();
var stepX = (cornerX - floatingMenu.nextX) * .07;
if (Math.abs(stepX) < .5)
{
stepX = cornerX - floatingMenu.nextX;
}
var cornerY = floatingMenu.calculateCornerY();
var stepY = (cornerY - floatingMenu.nextY) * .07;
if (Math.abs(stepY) < .5)
{
stepY = cornerY - floatingMenu.nextY;
}
if (Math.abs(stepX) > 0 ||
Math.abs(stepY) > 0)
{
floatingMenu.nextX += stepX;
floatingMenu.nextY += stepY;
floatingMenu.move();
}
setTimeout('floatingMenu.doFloat()', 20);
};
// addEvent designed by Aaron Moore
floatingMenu.addEvent = function(element, listener, handler)
{
if(typeof element[listener] != 'function' ||
typeof element[listener + '_num'] == 'undefined')
{
element[listener + '_num'] = 0;
if (typeof element[listener] == 'function')
{
element[listener + 0] = element[listener];
element[listener + '_num']++;
}
element[listener] = function(e)
{
var r = true;
e = (e) ? e : window.event;
for(var i = element[listener + '_num'] -1; i >= 0; i--)
{
if(element[listener + i](e) == false)
r = false;
}
return r;
}
}
//if handler is not already stored, assign it
for(var i = 0; i < element[listener + '_num']; i++)
if(element[listener + i] == handler)
return;
element[listener + element[listener + '_num']] = handler;
element[listener + '_num']++;
};
floatingMenu.init = function()
{
floatingMenu.initSecondary();
floatingMenu.doFloat();
};
// Some browsers init scrollbars only after
// full document load.
floatingMenu.initSecondary = function()
{
floatingMenu.computeShifts();
floatingMenu.nextX = floatingMenu.calculateCornerX();
floatingMenu.nextY = floatingMenu.calculateCornerY();
floatingMenu.move();
}
if (document.layers)
floatingMenu.addEvent(window, 'onload', floatingMenu.init);
else
{
floatingMenu.init();
floatingMenu.addEvent(window, 'onload',
floatingMenu.initSecondary);
}
//-->
</script>
Changes
Replace C_A_786 with your Twitter username
4. Save the Widget.
Note : The 5th step is not needed if you already have added Google + Button to your Blog
5.Now Go To Blogger > Design > Edit HTML and search for this,
</Head>
And just paste the Following Code above it
<script src='http://apis.google.com/js/plusone.js' type='text/javascript'> {lang: 'en-US'} </script>
6. Save your Template and You are Done !!! Congratulations !!!
All New & Cool AJAX Navigation Menu for Blogger
After so long time almost two months, i am here with awesome new blogger widget. It is very hard to manage the works and blogs simultaneously. But still love to give the new blogger widgets and tips.
AJAX Navigation menu for blogger is very new widget created by Me in Blogger platform that uses Blogger JSON feed API and AJAX. This navigation menu is inspired from Mashable.com old site. This widget was created some months ago, but there is no time for publishing this article. And now i recoded and improved this widget and added customizable features
Well, this widget is works based on jQuery library and Blogger JSON feed API. Your blog must be for Public visitors. other wise the Blogger JSON Feed API won’t works.
The menu is works just like normal drop-down menu when javascript is disabled, And it will turns to AJAX powered drop-down menu when javascript is enabled.
Demo
- 1.HOW TO INSTALL THIS WIDGET?
1.Go to Blogger Dashboard > Select the Blog > Go to Template page of theBlog.
2.Click Edit HTML button.
THE CSS
Add the Following CSS Code before ]]></b:skin>
/* Menu Stylings */
.w2bmenu *{margin: 0;padding: 0;}
ul.w2bmenu {background: #ededed;background: -moz-linear-gradient(top, #ededed 0%, #e0e0e0 100%);background: -webkit-gradient(linear, left top, left bottom, color-stop(0%,#ededed), color-stop(100%,#e0e0e0));background: -webkit-linear-gradient(top, #ededed 0%,#e0e0e0 100%);background: -o-linear-gradient(top, #ededed 0%,#e0e0e0 100%);background: -ms-linear-gradient(top, #ededed 0%,#e0e0e0 100%);background: linear-gradient(to bottom, #ededed 0%,#e0e0e0 100%);filter: progid:DXImageTransform.Microsoft.gradient( startColorstr='#ededed', endColorstr='#e0e0e0',GradientType=0 );list-style: none;width: 960px;margin: auto;border: 1px solid #cccccc;line-height: 1;}
ul.w2bmenu:after{margin: 0;padding: 0;content: ' ';display: block;height: 0px;clear: both;}
ul.w2bmenu li{list-style: none;float: left;position:relative;margin: 0;padding: 0;}
ul.w2bmenu li a{margin: 0;padding: 12px 16px;font-family: 'Helvetica Neue', Arial, Helvetica, sans-serif;color: #6b6b6b;text-shadow: 0 1px 0 #fff;font-weight: 700;text-transform: uppercase;font-size: 12px;display: block;}
ul.w2bmenu li a:hover,ul.w2bmenu li a.hoverover{background: #f5f5f5;}
ul.w2bmenu ul{position: absolute;display: none;top: 100%;border:1px solid #ccc;}
ul.w2bmenu li:hover > ul{display: block;}
ul.w2bmenu ul li{float: none;min-width: 160px;background:#f5f5f5;text-shadow: none;}
ul.w2bmenu ul li a{padding: 12px 14px;text-transform: none;font-weight: normal;}
ul.w2bmenu ul li a:hover,ul.w2bajaxmenu ul li a.hoverover{background: #fff;}
ul.w2bmenu ul ul{display: none;left: 100%;top: 0;}
/* AJAX Menu Stylings */
ul.w2bajaxmenu li div.submenu {display: none;position: absolute;width: 600px;z-index: 90;left: -1px;top: 100%;overflow: hidden;min-height: 150px;background: #fff;border:1px solid #cccccc;border-top: 0 none;}
ul.w2bajaxmenu li:hover div.submenu {display: block;}
ul.w2bajaxmenu ul {display: block !important;border: 0 none !important;}
ul.w2bajaxmenu ul li{background: none !important;}
ul.w2bajaxmenu ul.verticlemenu{position: absolute;width: 33%;left:0;top:0;bottom: 0;background: #f5f5f5;}
ul.w2bajaxmenu ul.postslist {position: relative;display: block;width:65%;float: right;margin: 8px 0;background: none;}
ul.w2bajaxmenu ul.postslist li{display: block;overflow: hidden;border-bottom: 1px #eee solid;position: relative;min-height: 60px;padding: 8px 8px 8px 110px;}
ul.w2bajaxmenu ul.postslist li:last-child{border-bottom: none 0;}
ul.w2bajaxmenu ul.postslist li .imgCont{position: absolute;left: 0;top:8px;width: 100px;height: 60px;overflow: hidden;border:1px solid #dcdcdc;font-size: 0;line-height: 0;}
ul.w2bajaxmenu ul.postslist li .imgCont img{position: relative;top:-20px;padding: 0;width: 100px;height: 100px;display: block;}
ul.w2bajaxmenu ul.postslist li a{display: block;line-height: 1.4;padding: 0;}
ul.w2bajaxmenu .loader{background:url('http://i.imgur.com/SeivG.gif') no-repeat scroll 0 0 transparent;width:22px;height:22px;position: absolute;top:50%;margin-top: -11px;right:5px;}
ul.w2bajaxmenu .menuArrow {border-bottom: 4px solid transparent;border-top: 4px solid transparent;border-left: 4px solid #999999;display: block;height: 0;margin-top: -4px;position: absolute;right: 11px;top: 50%;width: 0;}
THE JAVASCRIPT
If your Blog has jQuery plugin, then don’t add this plugin in your blog template,
Otherwise add the below line of code before </head> tag.
<script type="text/javascript" type="http://ajax.googleapis.com/ajax/libs/jquery/1.8.2/jquery.min.js"/></script>
Add the following Javascript code before </head> tag.
<script type="text/javascript" src="http://widgets.way2blogging.org/blogger-widgets/ajaxbloggermenu.min.js"></script>
<script type="text/javascript">
jQuery(document).ready(function($) {
$('#w2bajaxmenu').ajaxBloggerMenu({
numPosts : 4, // Number of Posts to show
defaultImg : 'http://url-to-image.com/default-image.jpeg' // Default thumbnail Image
});
});
</script>
THE HTML
In this section you should be carefully add the HTML, otherwise it won’t works.
The AJAX Menu accepts three types of urls. You must use this urls only in the menu. They are Label, Search Query and Label w/ Search Query.
Label URL http://yourblogdomain.blogspot.com/search/label/LABELNAME
Search Query http://yourblogdomain.blogspot.com/search?q=SEARCHQUERY
Label w/ Search Query http://yourblogdomain.blogspot.com/search/label/LABELNAMEq=SEARCHQUERY
<ul id="w2bajaxmenu" class="w2bmenu">
<li>
<a href="#">Home</a>
</li>
<li>
<a href="#">Example 1</a>
<ul>
<li><a href="http://yourblogdomain.blogspot.com/search/label/AdSense">Sample Label</a></li>
<li><a href="http://yourblogdomain.blogspot.com/search/label/Gadgets?q=harish">Label w/ Search</a></li>
<li><a href="http://yourblogdomain.blogspot.com/search?q=way2blogging">Search Query</a></li>
<li><a href="http://yourblogdomain.blogspot.com/search?q=This+is+long+query+you+do+not+get+any+results,+so+try+others">Unknown Search</a>
</ul>
</li>
<li>
<a href="#">Example 2</a>
<ul>
<li><a href="http://yourblogdomain.blogspot.com/search/label/Design">Design</a></li>
<li><a href="http://yourblogdomain.blogspot.com/search/label/Facebook?q=Like+Button">Facebook</a></li>
<li><a href="http://yourblogdomain.blogspot.com/search/label/Templates">Templates</a></li>
<li><a href="http://yourblogdomain.blogspot.com/search?q=Guest+Posts">Guest Posts</a></li>
</ul>
</li>
<li><a href="http://yourblogdomain.blogspot.com">Normal Link</a></li>
</ul>
FINAL WORDS!
I hope you enjoyed with this widget. I am really sorry for not posting new gadgets and templates regularly. I hope i will continue release new templates, widgets and tips.
Suggest new features, your feedback and your thoughts on this widget by leaving a comment and don’t forget to share this widget.
Blogger SEO has Made Easy with New Search Preference Option
Good News For All Bloggers!. Blogger has Introduced a New “Search Preferences” Option. This is Really a Great Option for blogs on Blogger Platform. Blogger added the Meta Tags, Customize Robots.txt, Redirects, Customize 404 Error Page option, Alt tags for Images.
SEO is a major part in any Website or Blog. Before Blogger had not Supported SEO. But now on Blogger SEO is Fully Functional and Dynamic. You can set the Meta Description for Each Single Post and Robots Tags separately.
1.BLOGGER ADDED THE FOLLOWING OPTIONS
1.Search Meta Description
2.Custom Post Meta Description
3.Custom 404 Error Page
4.Redirects
5.Custom Robots.txt
6.Custom Robots Header Tags
7.Alt and Title tags for Images
2.ENABLE THE SEARCH PREFERENCE OPTION
This option is only Available in New Blogger UI Dashboard. to Enable the Options
Go to New Blogger Dashboard > Select the Blog
Select the Settings Tab > Search Preference

SEARCH DESCRIPTION
This is the General Description for Home Page to Optimize Home page/Blog and this Description is Visible on Search Results of Home page.
Search Description Should be a Short Description about your Blog and Max 150 Characters in Length.

CUSTOM POST META DESCRIPTION
This is the Custom Post Meta Description for Each and Every Individual Post. You can Set and Customize the Each Post Description While Creating or Editing the post area.
Under the Post Settings(on Right side of Creating/Editing Post) Click the Search Description. Enter the Small Description about your Post. Looks like there is No Limits to the Description. But Google Will Crawl Around 160+ Characters only. So Keep your Post Description as Short as possible.

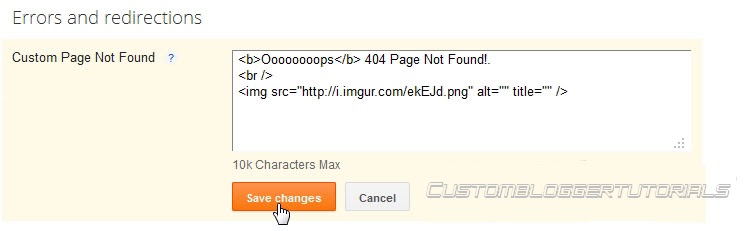
CUSTOM 404 ERROR PAGE
Bye bye!! Blogger Default Error/404 Not Found Page
Blogger Providing the Custom Error/404 Not Found Page. This Error/404 message is Usually Visible in Blogger Status Message Bar.
You can add Custom Error/404 message with HTML tags or Even Images Also
REDIRECTS
This is also A Great New Option in Blogger.
To Redirect a One Page form Another Page, You can use this Option and Redirect easily.
The Redirection is 302 Temporary Redirection and Redirection is sent through HTTP Headers.

____________________________________________________________________________________________________________________________________________________________________________________________________________________________________________________________________________________________________________________________________
__________________________________
__________________________________
5 Effective Ways to Build Organic Backlinks
Here are 5 Effective Ways to Built organic backlinks quickly. Apart from writing quality content and promoting it through social media, it’s necessary to have some quality backlinks to your blog. After the recent search algorithm changes by Google, many blogs are punished for several reasons. To stay safe and ahead of your competitors, it’s necessary to take some action and building organic backlinks will surely help.
This article is written after getting inspired from a video by Matt Cutts, the head of Google SPAM Team. He clearly mentioned some good points on how to build organic backlinks.
WHAT ARE ORGANIC BACKLINKS ?
There are thousands of ways to build links to your blog and none of them are equal to “Organic Backlinks”. In simple words, organic backlinks can be explained as the links that are naturally constructed, which usually happens when you focus on high quality and unique content.
HOW TO BUILT ORGANIC BACKLINKS ?
Here are 5+ sure fire tips that help to built organic backlinks to your blog.
1. CONTROVERSIES
Indulging in a Controversy will easily highlight things mostly if you are on the negative side. You need to follow-up regularly and have to be in touch with trending topics. Words have such a great power and believe me, with a single blog post you can grab the attention of the whole media. Play it safe or otherwise you may face some legal issues
2. EXPERIMENTS
Experimenting on things will depend on your interest and passion to achieve something. Not everyone can do experiments as it needs lot of time and patience. So, if you are goot at something, then try to experiment on things and publish posts like How-to guides on your blog. This is how unique content can be built and organic backlinks will flow to your article, sometimes for years.
3. FREEBIES
Using a feebie to get subscribers and backlinks is an old yet powerful strategy. You cannot get backlinks immediately, but over time you can get some quality backlinks. This depends on the quality and type of freebie you are providing. If its a regular one, like a free PSD template or a free theme then there wont be much use. Try to work on creative things and give them away for free.
4. COMMUNITIES
Lets consider some blogs in the WordPress niche. There are quite popular and useful blogs on WordPress that help to make the most out of your WordPress blog. Whenever they write an article or list out some resources, links to the articles on other blogs will be included. This purely depends on the author of the article and so its necessary to establish some connections with fellow bloggers.
5. VIDEO BLOGGING
Many have the talent to create useful videos yet don’t try it. Consistent exposure can be gained through video blogging and if you need a sort of inspiration to start with, then you can check TheNewBoston (http://thenewboston.org/tutorials.php). That guy got good programming skills and he is sharing some knowledge through his videos. Make videos and your articles will be linked on many blogs.
BONUS TIP
Forum Participation also helps to get some backlinks. All you have to do is help others by providing some useful answers for questions in sections you have knowledge on. And important thing is don’t SPAM posts with single word answers, it may result in a ban.
OVER TO YOU
That’s it from my side and if I have missed any important one, let me know through comments. If you don’t agree with any of these methods or want some proofs on how they work, lets start the discussion now.
How to Create Three Column Template For Blogger
You must have seen many blogs having three columns. You may also want to make your own three column Blogger Layout Template and give your blog a new level in style. So let's do it with a simple tutorial.
You can see in Design > Page elements that you already have two column, one for the main body and the other is the sidebar. So you need to create and add an extra sidebar column.
Adding the Third Sidebar Column in Blogger Template

1. Go to Design > Edit Template and backup your template.
2. Find:
#sidebar-wrapper {
width: 220px;
float: $endSide;
word-wrap: break-word; /* fix for long text breaking sidebar float in IE */
overflow: hidden; /* fix for long non-text content breaking IE sidebar float */
And change float to:
float: right;
3. Below it add:
#left-sidebar-wrap {
width: 220px;
float: left;
word-wrap: break-word;
overflow: hidden;
}
This "float: left" will make the sidebar float to left. Thus you will be having a sidebar to the left of your blogger template.
4. Find and change the width of the outer-wrapper to 900px or more to avoid overlapping of sidebar over the main-wrapper
#outer-wrapper {
width: 660px;
margin:0 auto;
padding:10px;
text-align:$startSide;
font: $bodyfont;
}
5. Find #main-wrapper and replace it with:
#main-wrapper {
width: 410px;
float: left;
margin:0 20px;
word-wrap: break-word; /* fix for long text breaking sidebar float in IE */
overflow: hidden; /* fix for long non-text content breaking IE sidebar float */
}
Here a margin to left and right of 20px is added to avoid overlapping of sidebars with the main wrapper. You can change it accordingly to overcome the issue of overlapping of sidebars.
7. Find the section:
<div id='main-wrapper'>
And just before this add:
<div id='left-sidebar-wrap'>
<b:section class='sidebar' id='left-sidebar' preferred='yes'/>
</div>
8. Save your template and "Wallah", its done. You have created an extra sidebar for your Blogger template.
Now you have to do some adjustments yourselves. Adjust the widths by altering the pixels (px) of the "outer-wrapper", "main-wrapper", "sidebar-wrapper" and "left-sidebar-wrap". Adjust the margins, paddings and width by same way to "header-wrapper" and "footer-wrapper" to match the style.
.jpg)

.jpg)